While work boots are designed to be put through the ringer, they need regular attention and upkeep to retain their protective qualities. This is especially important if you work in wet environments.
Wet boots can lead to a host of issues if not properly dealt with. While many guys think that a quick air dry overnight will do the trick, they’re often surprised to find that their boots are still soaking wet when morning comes.
Who wants to wear wet boots all day? Not only is it uncomfortable, but it can affect your overall work performance and safety. Wet boots can lead to the growth of bacteria, noticeable odors, and painful blisters.
If you find yourself in the precarious situation of having to dry your work boots before your next shift, don’t fret. There are many easy and effective techniques that you can use to draw out moisture in no time.
Before You Start
Before you jump in, there are some things you need to do to prepare your boots for drying. First, take off your laces. Boot laces can be dried relatively quickly by simply hanging them in a dry spot.
Leaving them on your boots can slow down the drying process and result in damage over time.
After that, it’s recommended that you give your boots a thorough cleaning. Yes, you’re going to start the drying process by getting your boots even wetter. More specifically, you need to make sure that the exterior of the boots is free of dirt.
You can use a mild detergent and some warm water to get rid of any grime that accumulated throughout the day.
The purpose of this is to avoid permanent staining on the leather uppers. Mud can easily bake onto the textured surface of the leather. Once you’ve cleaned the boots, simply pat it dry with a towel and move onto one of the four methods.
4 Ways to Dry Wet Work Boots
#1. Use a Fan

A strong fan can be used to blast fresh air into your boots for quick drying. The process can evaporate moisture overnight while you sleep.
You’ll need a traditional fan that’s larger than your two work boots put together. The fan should also have a wide and stable base.
To prepare your boots, make sure that they’re clean and free of laces. If you have a removable insole, take them out.
Traditional foam insoles can be thrown into a dryer. However, leather insoles should be left out in the sun to dry.
Place a towel underneath the base of the fan to catch any excess water that might drain out of the boots. Then, take some durable wire and bend it into an “S” hook.
One curve should be small enough to hold onto the wire housing of the fan while the other curve needs to be large enough to hold your boot at the tongue flap.
You’ll need one hook for each boot. Simply hang your boots against the fan with the interior facing the blades. Turn on the fan and leave the setup running overnight.
#2. Newspapers
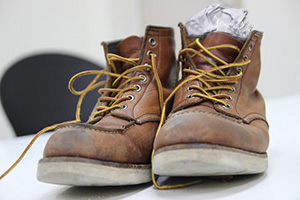
The newspaper method is effective for thinner or delicate boots. While the process does take a bit longer than the previous fan technique, it’s easy to perform.
Furthermore, the newspaper material is easier on the boots and can help to retain their shape.
After cleaning the boots and removing laces, take out the insoles. Then, stuff the interior with old newspaper. It should be packed tight enough to hold the shape of the boot. Then, wrap the exterior in more newspaper.
Over the course of a couple hours, the material will draw moisture out. The newspaper should be removed and replaced every 2 to 3 hours until the boots are fully dry.
#3. Use 1 or more Towels
This method is very similar to the former technique. However, it utilizes reusable towels and takes advantage of the light breeze created by a fan. It’s most effective for light leather boots.
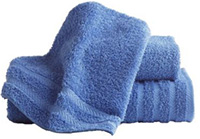
Once you’ve removed the laces and insole, stuff the corners of a large towel into the boot.
Then, wrap the rest of the towel around the entire boot. Place the boots under a fan and let the towels do their work.
Like with the newspaper trick, moisture is drawn out of the boots and into the towel. You’ll need to replace the towel with a dry one after a few hours. Simply repeat the steps until both boots are dry and ready to wear.
#4. The Power of the Sun

The sun is free, natural, and effective, so why not take advantage of it? You can simply set your boots outside on a surface that has exposure to the sun.
The rays of the sun will evaporate moisture and kill pathogens that lead to bacteria growth.
The main downside to sun drying is time. It’s not the fastest solution. Not only that, but you’re at the whims of Mother Nature. It’s recommended that you don’t rely on this method every time.
Too much sun exposure can eventually damage the leather material on your boots if they’re not properly maintained.
What You Shouldn’t Do
One thing to note is that all of these methods take time. When it comes to protecting your boots, time is key. A relatively slow drying process will help you avoid damage.
While it may be tempting, it’s imperative that you don’t use direct heat to speed things up. This includes using blow dryers, stoves, ovens, or heaters.
Direct heat will cause noticeable damage to the leather uppers. Too much heat will cause the material to wrinkle and crack. Additionally, the heat can affect the glue that holds your boots together.
With that being said, sometimes using a bit of heat is your only option. For example, you may be working in a remote location and only have a campfire to get the job done.
If that’s the case, place your boots at least 2 to 3 meters away from the fire. The boots will be able to take advantage of the heat without experiencing damage.
Over to You
Gone are the days of going to work with soaking boots. These tips are cheap, reliable, and safe alternatives to expensive equipment. They’ll help you prepare your boots for the next work day while ensuring that they remain durable for many years to come.

